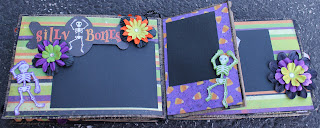
Hello Everyone! Halloween is just around the corner! Wouldn't this be so cute to put pictures of all the fun the kids had that night in an album like this?! I made this Halloween mini book for my very first post for Glue Dots. I attached my paper lunch bags by folding the flap over and attaching two bags together by putting them flap to flap and using a piece of paper and then attached them all together. Don't worry, I'll show you. I used black acrylic paint to distress the album. I used Glue Dots Lines to attach the paper to the album. I used the pop up Glue Dots under the embellishments to add some dimension. The flowers are all layered with the Glue Dots Craft dots and attached to the book with them as well. They are a dream to work with and held everything securely, even after I glimmer misted them.
Here I used the Glue Dots Continuous Lines to attach the ball trim. It was so easy!
Here's the list of everything I used then I will show you how I attached the bags together to get the flap for extra pics. I also left the bag ends open in case I have extra pictures or I decide to make big tags to put in there for journaling. There are lots of possibilities with this type of album.
Glue Dots - Craft, Lines, Continuous Lines, Pop Up and Craft
Paper - K&Co HW
Flowers - Bazzil, Recollections and Prima
Tattered Angels Glimmer Mist - Dazzling Diamonds, Black Magic, Deep Plum and Jack O Lantern
Bling - Want to Scrap
American Crafts Thickers - Chipboard (black sparkly)
Stickers - K&Co - TC Halloween, HW Tombstone, HW Haunted House, HW Character,
HW Pumpkin
Making Memories - Foam Halloween (the spiders on the last layout)
Die Cuts - K&Co HW words and Die Cut Cardstock
Distress Ink - Black Soot
Punch - Martha Stewart Gate Punch
Ok...here's how I attached the paper lunch bags together. You can find these anywhere and it doesn't matter what size you use. In the book I made I used 6 paper lunch bags all attached together like this.
You can leave your flaps open if you want or use Glue Dots Craft Dots to close them like I did.
Once you attach all the signatures together use your Glue Dots Mini Dots to close all the gaps and flaps til you have the look you want. I used the black acrylic paint to paint the spine and then dry brush over the pages.
So, there ya have it. I hope you try it yourself! Just think of the possibilities!
Thanks for looking!
Kimberly
Disclosure: Glue Dots® Adhesive was provided, free of charge, by Glue Dots. This post was written while I participated in the Glue Dots® design team as a Dottess.


Fabulous Album Kim! Great explanation of how it all went together, I always forget how to make those LOL.
ReplyDeleteHugs